

Settings & Preferences
Configure languages, code format, displays, capture modes, audio, and answer preferences.
Settings & Preferences
Start with language, capture, and audio. Expand other settings only when you need them.
| Your goal | Section |
|---|---|
| Separate input/output languages or change code language | Languages & code |
| Capture another display or auto-submit images | Displays & screenshots |
| Capture your microphone or meeting audio | Audio input |
| Shorter, structured, or bilingual answers | Answer preferences |
| Auto-submit your own questions or improve recognition | Advanced voice settings |
| Change opacity, shortcuts, or use mouse controls | Window & controls |
Languages & code
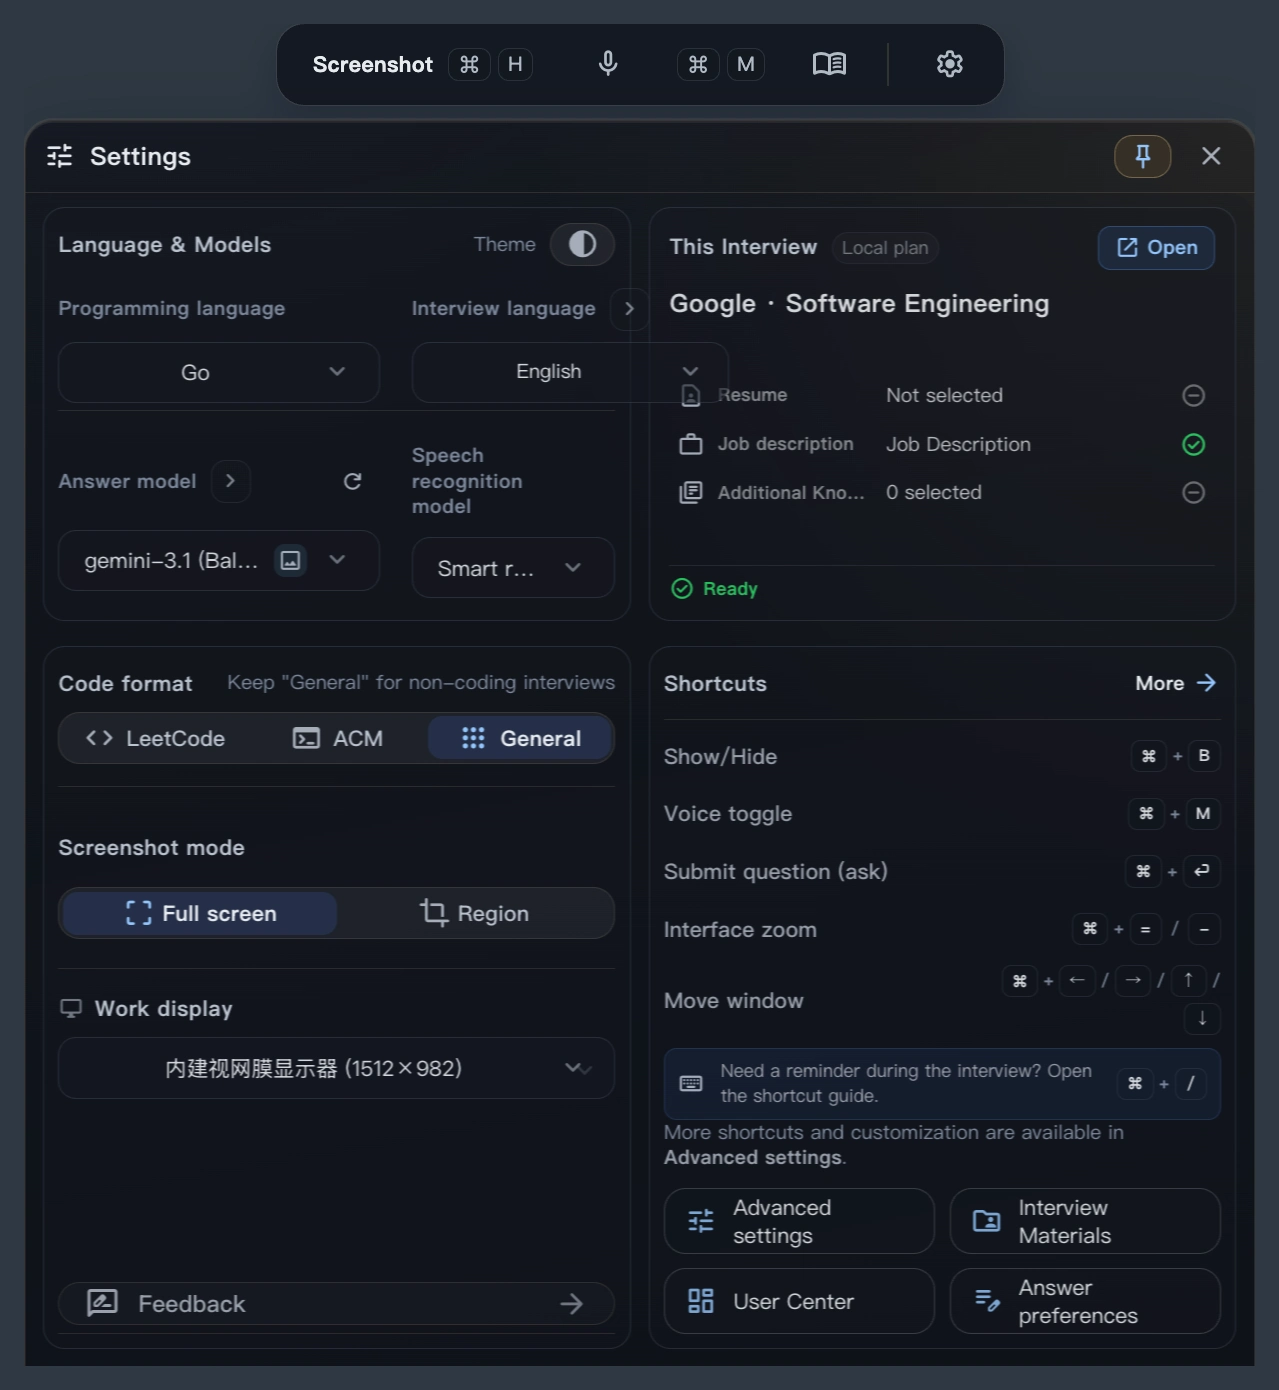
Open Settings → Language & Models.
| Setting | Controls | Example |
|---|---|---|
| Interview language | Default response and speech-recognition language | English for an English interview |
| Answer language | The language of AI responses | Spanish answers to English questions |
| Speech language | Recognition of incoming speech | Match the language being spoken |
| Interface language | Buttons and menus | Does not change AI answers |
| Programming language | Generated code | Python, Java, C++, and others |
For one language, set Interview language. Expand advanced language options to separate them. The interface follows the answer language by default.
Example: English questions, Spanish explanations, Python code. Choose English for the interview, Spanish for answers, and Python for code. Live translation adds transcript translations; it does not change the answer language.
LeetCode, ACM, or General format?
Under Code format preference, choose LeetCode to complete a provided function, ACM to write a full program that reads standard input and writes standard output, or General for other code questions. Programming language controls the language; format controls the code structure.
Do I need a separate screenshot model?
Screenshot and interview answers use the Q&A model by default. Expand advanced model options to override them. A screenshot model must support image input. Try one question before using a new selection.
Check the current interview
Open Settings → Current Interview. Choose an Interview Plan to load its linked materials, or No linked plan to select them directly. Check the company, role, and selected personal, job, and supporting materials.
If an item is still processing or needs attention, open it, review the result, and save and confirm it before using it. See Interview Materials.
Displays & screenshots
- In Settings → Display, select the screen containing the question. Captures and window movement follow this display.
- Choose region or full-screen Capture mode. Use a region for focused content and full screen for spread-out content.
- Take a test capture and confirm the correct display and full question are visible.
Check the display selection after connecting or unplugging a monitor. Use Cmd/Ctrl + R to reset a misplaced window.
Generate an answer immediately after capture
Enable Auto-submit after screenshot in Answer Preferences. When disabled, click Submit or press Cmd/Ctrl + Enter after capturing. See the screenshot demo.
Audio input
The toolbar's Microphone captures you. System Audio captures the other person playing through your meeting app.
| Situation | Input |
|---|---|
| Transcribe both sides of a video meeting | System Audio + Microphone |
| Capture only the other person | System Audio |
| Ask practice questions aloud | Microphone, with Manual submission or an adjusted auto-submit scope |
Use headphones. Check one sentence from each person after listening starts to confirm both input selection and permissions. See Voice & Transcription.
Answer preferences
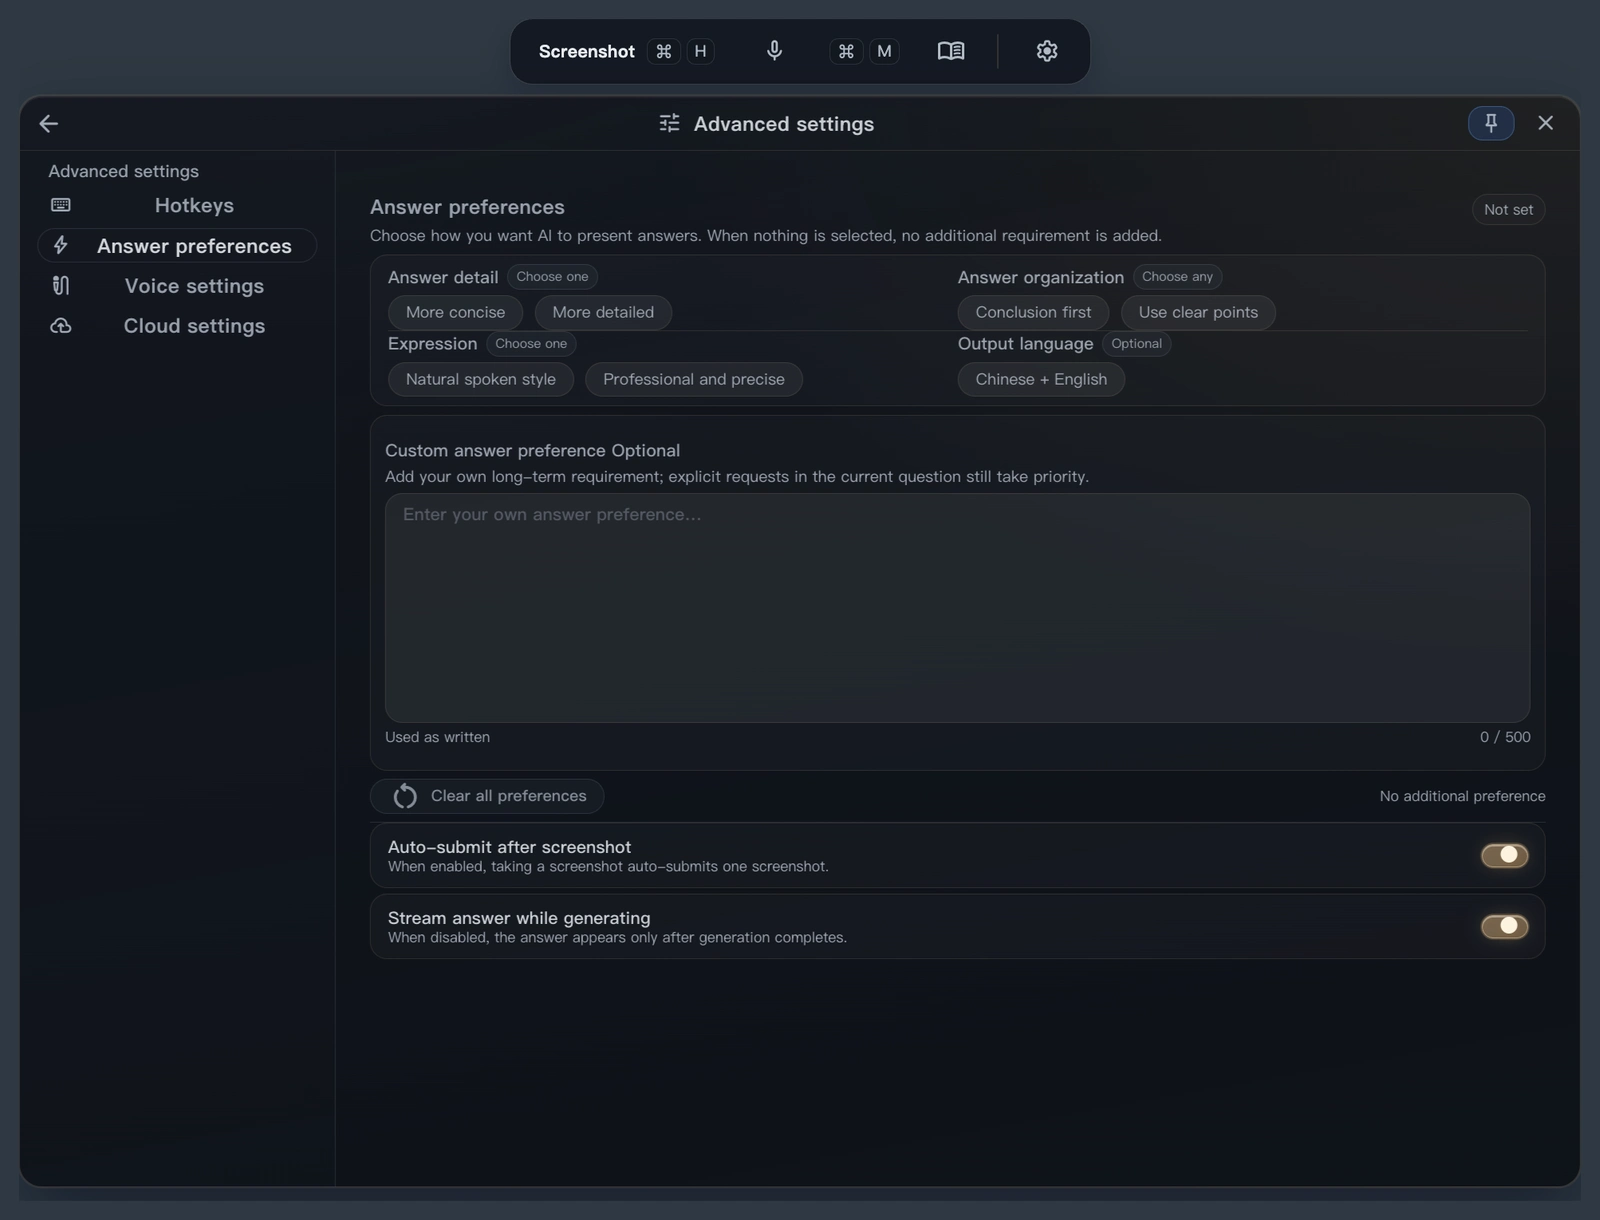
Open Answer Preferences from Settings. Choose length and structure, then add one useful instruction.
For example: “Start with the conclusion, then give two supporting points. Use conversational language.” Select bilingual output when needed, and avoid conflicting language instructions.
Show answers only when complete
Turn off Stream answers to wait for the complete response. Keep it on to read as the answer is generated.
Advanced voice settings
Include my questions in Auto mode
Choose Advanced Settings → Auto-submit scope → Interviewer + candidate, then enable Auto in the voice panel. The default is interviewer only. For occasional questions, submit manually. Scope controls whose speech can trigger an answer, not its language.
Misrecognized terms or questions split too early
In Voice Settings → Hotwords, add custom vocabulary such as company names, project names, and acronyms. Increase the pause before a sentence is finalized if long questions are split too early, then test the same sentence. Use Manual if you only need control over when answers start.
Show Chinese translations below English speech
Enable Live translation. The next time you start transcription, both speakers' English transcripts include translations. Available on the Flagship plan. Saved speech-language settings stay unchanged; answers still follow Answer language and Answer Preferences.
Include supporting materials in answers
Voice Knowledge Base controls retrieval from this interview's supporting materials. When on, items marked “AI Q&A + Cheatsheet” can contribute to voice or text answers. “Cheatsheet only” items remain local references. Select personal and job materials under Current Interview; see Interview Materials.
Should I change automatic hotwords or message filtering?
Automatic hotword enhancement adds names and technical terms from supporting material; availability follows your plan. You can also add known problem terms manually without changing the speech route.
Message filtering limits which roles contribute to voice context. It is separate from auto-submit scope. To control whose questions trigger answers, change the scope instead. Context length is managed automatically; there is no message-count setting to tune.
Window & controls
- Opacity: adjust the toolbar and panels in Advanced Settings, or use
Cmd/Ctrl + [ / ]. - Shortcuts: change conflicting combinations, press Enter to save, or restore the current page's defaults.
- Mouse controls: click Screenshot to capture, Submit to send a screenshot, or the voice controls to start or pause transcription.
- Scroll answers: prefer
Cmd/Ctrl + Shift + ↑ / ↓to keep the pointer in your current app. With passthrough active, wheel input may reach the app behind the assistant. See Shortcuts & Mouse Controls.
Choose a theme and opacity
Start with readable answers, then reduce how much of the screen the assistant covers. Press Cmd/Ctrl + Shift + T to switch themes and Cmd/Ctrl + [ / ] to adjust opacity. Advanced Settings also has separate controls for the toolbar and panels.
| What's behind the assistant? | Try this first |
|---|---|
| A white webpage, document, or question bank | Light theme with enough opacity to keep background text from showing through |
| A dark editor, terminal, or meeting window | Dark theme to match the surrounding brightness; keep answer text clearly visible |
| A question you need to read alongside a short answer | Lower panel opacity slightly and move the assistant beside the question |
| Long answers, code, or detailed diagrams | Increase panel opacity for easier reading |
| Moving video, colorful wallpaper, or dense text | Increase opacity or move the window before choosing a theme |
Higher opacity means a more solid background; lower opacity reveals more of the window behind it. Check a few lines of small text or code after adjusting. Themes and opacity change your local view; use Stealth Mode to control the shared view.
Session sync, account, and updates
Cloud session sync uploads transcripts and session information for review, not raw audio or original screenshots. Screenshot Q&A text already recorded in the transcript can sync with it. Manage material uploads separately under Interview Materials.
Interview review uses the transcript; it does not assess vocal tone or emotion. See Interview Review.
Account, plan, usage, and updates appear at the bottom of Settings. After downloading an update, use the restart-to-install action when ready. Cmd/Ctrl + R resets layout only; Cmd/Ctrl + G starts a new session and clears current content.
Something missing or unclear?
Tell us which page or step needs work.
AI Reading Assistant
Send to your preferred AI
Smart Summary
Deep Analysis
Key Topics
Insights